How to Consolize an MVS Board

In This Guide
In this guide I will show you how to consolize an MV-1C MVS board. What is consolization you ask?
Consolization is basically turning an arcade board which is made to be played in an arcade cab playable on a regular TV with control pads just like any other home console, hence the name "Consolization". The difference between a CMVS and a supergun is that a CMVS is a "dedicated" supergun that only plays MVS games.
This is where you ask yourself do you want to make a CMVS or a supergun. You decide.
Parts Needed
- Wiring (I use 22 awg usually)
- Solder (I prefer leaded 2% silver)
- Soldering Gun
- Audio, Video and Power Jacks (I use color coded Gold Panel Mounts)
- RGB > NTSC Video Encoder (Neobitz, JROK or similar)
- +5v Power Supply, I prefer this one from Jameco.
- Dremel or Xacto Knife for cutting
- DB15 Controller Ports
- Ice Cold Beer (After Completion)
Enclosures
For enclosures it is all up to you, you can either do an "Open Face" CMVS which is a bare board with no fancy enclosure or a fully cased CMVS. Keep in mind that putting an MVS board into a case can be difficult and also may take you a while to find an enclosure you like.
Several companies make plastic, wood and metal enclosures. Hammond Manufacturing makes both plastic and metal ones. Other companies like PacTec only make plastic ones. Some CMVS builder have used Plexiglass, old PC cases and even NGH and NeoCD cases. Making an "Open Face" CMVS takes about 3-5 days to complete depending on cleanliness. An enclosed CMVS can take up to 3 weeks depending on difficulty with the casing material. However an "Open Face" 2 slot will only take you about 8 hours or less total build time, this is due to having everything you need already on the board and all you need is a PSU and RGB > NTSC Encoder.
Stereo Sound Mod
The MV-1C board does not give Stereo Sound off the jamma edge so you will need to do a simple hack to achieve Stereo Sound.
First, you need to remove the heat sink on the board. That is the big silver thing on the bottom right corner of the board. You can remove it by either desoldering it or just clipping the legs. I don't ever plan on re-using them so I just cut the legs and then desolder the 2 posts holding it to the board.
Click on the images for a larger view
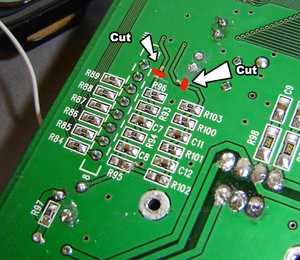
In figure 1-1 you will need to cut the 2 traces indicated.
You can use an Xacto knife to cut them but I prefer to use a dremel to kind of carve it out a little to ensure that the traces are no more.
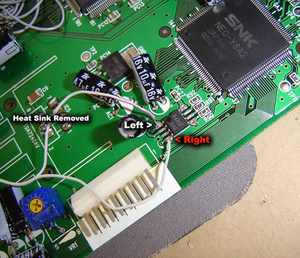
In figure 1-2 is the onboard sound chip on the MV-1C.
Gently bend back the surrounding capacitors to get to Pins 1 & 4. Solder a wire to each pin.
Pin 1 is audio Left
Pin 4 is audio Right

