Can you help me fix the AES I just broke?

Joined
Sep 23, 2020
Posts
16
Title says the predicament I'm in...

I have a 1st version Neo Geo AES Gold system that my brother purchased new in 1991. It's still my brother's I'm just in possession of it ATM.

I was going to do an RGB bypass mod on it because he has always been unhappy with the RGB output of his AES.

While I was in there, I decided to install the unibios because he's always wanted it. This is where I started messing up.

I am pretty good at soldering. I am very bad an desoldering. The cheap tool I was using to desolder broke halfway though desoldering NEO-EP0.

I did the rest using desolder braid. I did ok until pin 30. pin 30 was hopelessly stuck and I coudn't get it out. Several traces run under pin 30 and I went and tore through them.

I need to remember I suck at desoldering. I'll probably forget.

After causing much damage, I got pin 30 out and installed the socket/unibios 4.0.

I turned on the AES just to see what would happen and it wasn't good. a signal that wouldn't sync and a checkerboard/color pattern.

I repaired the traces using wire and tried again. Same thing. That surprised me. I expected some difference.

I don't have pinouts for this exact board, so I used the pinout below (courtesy of http://www.jamma-nation-x.com/jammax/tutorials.html):
aesbiospinout (1).jpg


I tested all the connections that I could. This AES does not have NEO-E0, NEO-G0 or LSPC2.

I was able to test connectivity to the 68000-12, 43256, and HC259.

Everything was fine except for pin 21. Pin 21 had significant resistance between it and the 68000-12 and 43256. The connection to HC259 was fine.

I don't know if this is normal, because the pinout above is not for the revision of the AES I'm working on.

This is what I get when I turn it on:

20211210_122511-ANIMATION.gif


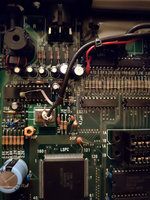
This is what the board looked like when I was done installing the socket (I'm so embarassed):

IMG_20211210_082734618.jpg


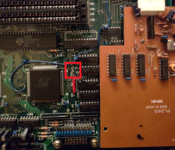
This is where I think the broken traces are supposed to go:

AES_broken_traces_wip.jpg


Again, the symptoms are EXACTLY the same with or without the traces broken.

Does any of this mean anything to anyone? Does it look like I identified the correct repairs?

Does anyone know anything else I can check? I only have a multimeter. no logic probe or oscilloscope.

Thanks.
 

Atro

Who?,
20 Year Member
Joined
Jan 30, 2002
Posts
9,214
Are you trying with the original bios or the uni?

You may have applied too much heat and killed a RAM chip. I luckily had a few mv1 boards lying around and was able to tackle the issue in one particular AES that had a problem just like yours. A dead RAM chip was the culprit.

Your problem may differ.
 
Joined
Sep 23, 2020
Posts
16
Are you trying with the original bios or the uni?

You may have applied too much heat and killed a RAM chip. I luckily had a few mv1 boards lying around and was able to tackle the issue in one particular AES that had a problem just like yours. A dead RAM chip was the culprit.

Your problem may differ.
Thanks for the reply.

I tried both. Unibios and the original bios.

I didn't go near any other components, other than the NEO-EP0.

Wouldn't that have to be a hell of a lot of heat to kill the RAM?

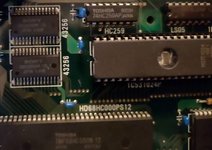
I'm guessing you are referring to 43256?

IMG_20211210_154948919.jpg

Edit: I have several mv-1c and mv-1b boards. Can I swap the Toshiba RAM from the mv-1b into the AES?
 
Last edited:

Atro

Who?,
20 Year Member
Joined
Jan 30, 2002
Posts
9,214
Thanks for the reply.

I tried both. Unibios and the original bios.

I didn't go near any other components, other than the NEO-EP0.

Wouldn't that have to be a hell of a lot of heat to kill the RAM?

I'm guessing you are referring to 43256?

View attachment 54286

Edit: I have several mv-1c and mv-1b boards. Can I swap the Toshiba RAM from the mv-1b into the AES?
That was the lower one for me. But again, it might not be your case.

I d re-check every connection/trace, both top and bottom of the board. Some are very hard to trace as they go under some components. All I xan do for you, is to encourage to follow through. AESs dont deserve that fate.
 
Last edited:
Joined
Sep 23, 2020
Posts
16
That was the lower one for me. But again, it might be your case.

I d re-check every connection/trace, both top and bottom of the board. Some are very hard to trace as they go under some components. All I xan do for you, is to encourage to follow through. AESs dont deserve that fate.
I agree 100%. This thing is like a family member. I'm beside myself that I did this to it.

I went over everything several times. without documentation for this model, it's difficult for me.

All pins are at least making contact with the fist contact point. All but pin 21 mapped properly (according to the pinout above) to the 68000.

I should also mention that my brother had a switch installed that I believe enabled him to switch between composite and c-sync. The wiring was very thin/frail and it came undone. I BELIEVE I've put things back the way they were.

IMG_20211210_170553037.jpg
I am pretty sure the right most 2 resistors by the DIN were wired to a switch that would allow him to choose composite vs c-sync.
This is how it looks now.

I knew things were not right when I tested it, but I didn't know if the lack of sync was from his modification coming undone (and my subsequent undoing of it) or the BIOS install going bad.

The modification is apparently described in this thread.


I am working on (ruining) official ninja's AES.

Also - this wire came undone but I soldered it back where it belongs:

1639174330839.png
 

ack

Ninja Combat Warrior
15 Year Member
Joined
Apr 9, 2009
Posts
539
You will want to check that you didnt bridge any of those traces near that mess under the bios.
 

Neo Alec

Warrior of the Innanet
20 Year Member
Joined
Dec 7, 2000
Posts
12,008
I always warn against this install if you're not confident in your desolder skills. That list of connections you posted is exactly what you need. Check each pin of the socket against the others to make sure none are connected to each other that shouldn't be. And go through and check off each connection on that list again.
 
Joined
Sep 23, 2020
Posts
16
I always warn against this install if you're not confident in your desolder skills. That list of connections you posted is exactly what you need. Check each pin of the socket against the others to make sure none are connected to each other that shouldn't be. And go through and check off each connection on that list again.
Will do.

Since this is a v1 AES it does not have NEO-E0, NEO-G0 or LSPC2.

Does anyone know of other possible places to check, or can point me towards somewhere (besides google, I've been looking there) that might shed some light on other places to check?

Thanks again.
 

RAZO

Mayor of Southtown
15 Year Member
Joined
Dec 2, 2006
Posts
8,790
If you don't feel comfortable fixing it and you want to save your beloved gold system console. I would talk to James at Jamma Nation X and send it over to him.

James has been doing mods and repairs on my Neo-Geo stuff since I joined the forum. He's the only guy I trust when it comes to anything Neo-Geo.
 
Joined
Sep 23, 2020
Posts
16
If you don't feel comfortable fixing it and you want to save your beloved gold system console. I would talk to James at Jamma Nation X and send it over to him.

James has been doing mods and repairs on my Neo-Geo stuff since I joined the forum. He's the only guy I trust when it comes to anything Neo-Geo.
I think that's the ticket!

Thanks.
 

Atro

Who?,
20 Year Member
Joined
Jan 30, 2002
Posts
9,214
I always warn against this install if you're not confident in your desolder skills. That list of connections you posted is exactly what you need. Check each pin of the socket against the others to make sure none are connected to each other that shouldn't be. And go through and check off each connection on that list again.
The easiest way to do it, is to clip all the bios legs.

Afterwards, using a plier to pull the legs while heating them is easy as pie and very clean. The original bios is a goner tho. 😀
 

wyo

King of Spammers
10 Year Member
Joined
May 22, 2013
Posts
10,164
If you don't feel comfortable fixing it and you want to save your beloved gold system console. I would talk to James at Jamma Nation X and send it over to him.

James has been doing mods and repairs on my Neo-Geo stuff since I joined the forum. He's the only guy I trust when it comes to anything Neo-Geo.
+1 for JNX, Big Bear does great work as well.
 
Joined
Sep 23, 2020
Posts
16
The easiest way to do it, is to clip all the bios legs.

Afterwards, using a plier to pull the legs while heating them is easy as pie and very clean. The original bios is a goner tho. 😀
This was my biggest mistake. I wanted to preserve the original for some reason.

Side with pins 1-20 are perfect.

Side with pins 21-40 had issue with pin 30 and pin 40.

I was able to successfully dump the bios after pulling it.

I see some people are now piggybacking the new bios on top of the original.

I don't like the look, but at least it's hard to do what I did with that method.

Can piggyback be done on every model of AES ?
 

thegreathopper

NAM-75 Vet
20 Year Member
Joined
Jun 3, 2002
Posts
1,011
Piggybacking is painless if you have the room, it’s the method I use. Good luck with your repairs.
 

Neo Alec

Warrior of the Innanet
20 Year Member
Joined
Dec 7, 2000
Posts
12,008
I guess you can piggyback if you can't desolder. The bios is too close and barely clears the cart doors on most revisions. A socket takes enough space as it is. But don't desolder unless you have the equipment and know how to do it cleanly.
 

Heinz

Parteizeit
15 Year Member
Joined
Feb 13, 2005
Posts
22,401
I initially tried to desolder the original bios whole but ended up clipping the legs. Without skill or a proper desolder station I wouldn't even bother attempting the former. Even then I managed to kill a couple traces. Just keep in mind you may have broken a trace that is unrelated to the bios as in my case the struggle to remove the bios was enough to break a 68k trace.
 

Hawwa

B. Jenet's Firstmate
Joined
Sep 21, 2018
Posts
408
I tried to desolder mine but give up. I was really careful though, I only used new solder and braid but since the OG didn't come loose I just resoldered with care and everything works fine still.

I don't know if I will piggyback or just cut the OG bios. I wanted also to preserve the MF original chip for some reason...
 
Joined
Sep 23, 2020
Posts
16
I successfully desoldered 2 z80 cpus from my broken CPS1 boards this week. There was no pressure since I have already replaced those boards because the sound didn't work. I suspect had it mattered, the tool would have broken again. Now, I'm going to replace the z80s and see if that was the issue.
 
Joined
Sep 23, 2020
Posts
16
I believe I have fixed my brother's AES.

I purchased a Japanese AES to replace his USA model. This way if it was never fixed, for some reason, he'd still have access to his library of games.

The Japanese AES was a 3-6 model. I did the unibios (piggyback with socket) and RGB bypass on it. Everything came out great.

From doing the Japanese AES I learned that the AES has no sync until the bios kicks in. My brother's AES was in this state and the bios was not kicking in. That eliminated the potential issue with the video that I originally referenced. So, at least it was 1 less issue to worry about.

I found an old post on this forum (https://www.neo-geo.com/forums/index.php?threads/bios-pinout-for-1st-gen-aes.217601/) that detailed a pretty similar issue to what I was going through and it contained the detailed pinout for the original AES. I'll post a link to it when I have more time and I will thank the original posters. I only had my search privileges activated a few days ago, or I would have probably found it sooner. (I think there was a glitch with my account. No biggie.)

With this new information I was able to determine that I had to patch pin 21 of the unibios to pin 10 of the 43256, in addition to the patching I originally outlined.

I also had to straighten out the broken traces and make sure that none were touching each other since they were still connected on one end (thanks @ack ).

After doing all that, I got unibios to load!

Of course, I figured this out after purchasing a replacement AES. That's my fault, but I don't believe I would have fixed it otherwise. That's just how my life works. I'll either sell the Japanese AES or keep it for a while (forever?).

The only potential issue I see is that, when using the NeoSD AES cart, if I choose any region + arcade there is no demo sound at all, regardless of the setting in the softdips.

It does take a few extra seconds for the game to start after the Neo Geo splash screen in arcade mode as well. The credit sounds and game sounds work perfectly. This issue is obviously not present in console mode.

I don't have a lot of experience with NeoSD and AES. I don't have any other AES carts to test with. I don't know if this is normal or common. I'll have to borrow some carts to test.

Thanks for the help and well wishes. I could not have solved this problem without this forum.

Edit:

Thanks to

@shadowkn55
@Xian Xi
@smkdan

For the information in the above referenced post from 2012-2014.
 
Last edited:
Top