Anyone opened a wooden analogue joystick?

Mendel

Vanessa's Drinking Buddy
Joined
Sep 3, 2012
Posts
1,187
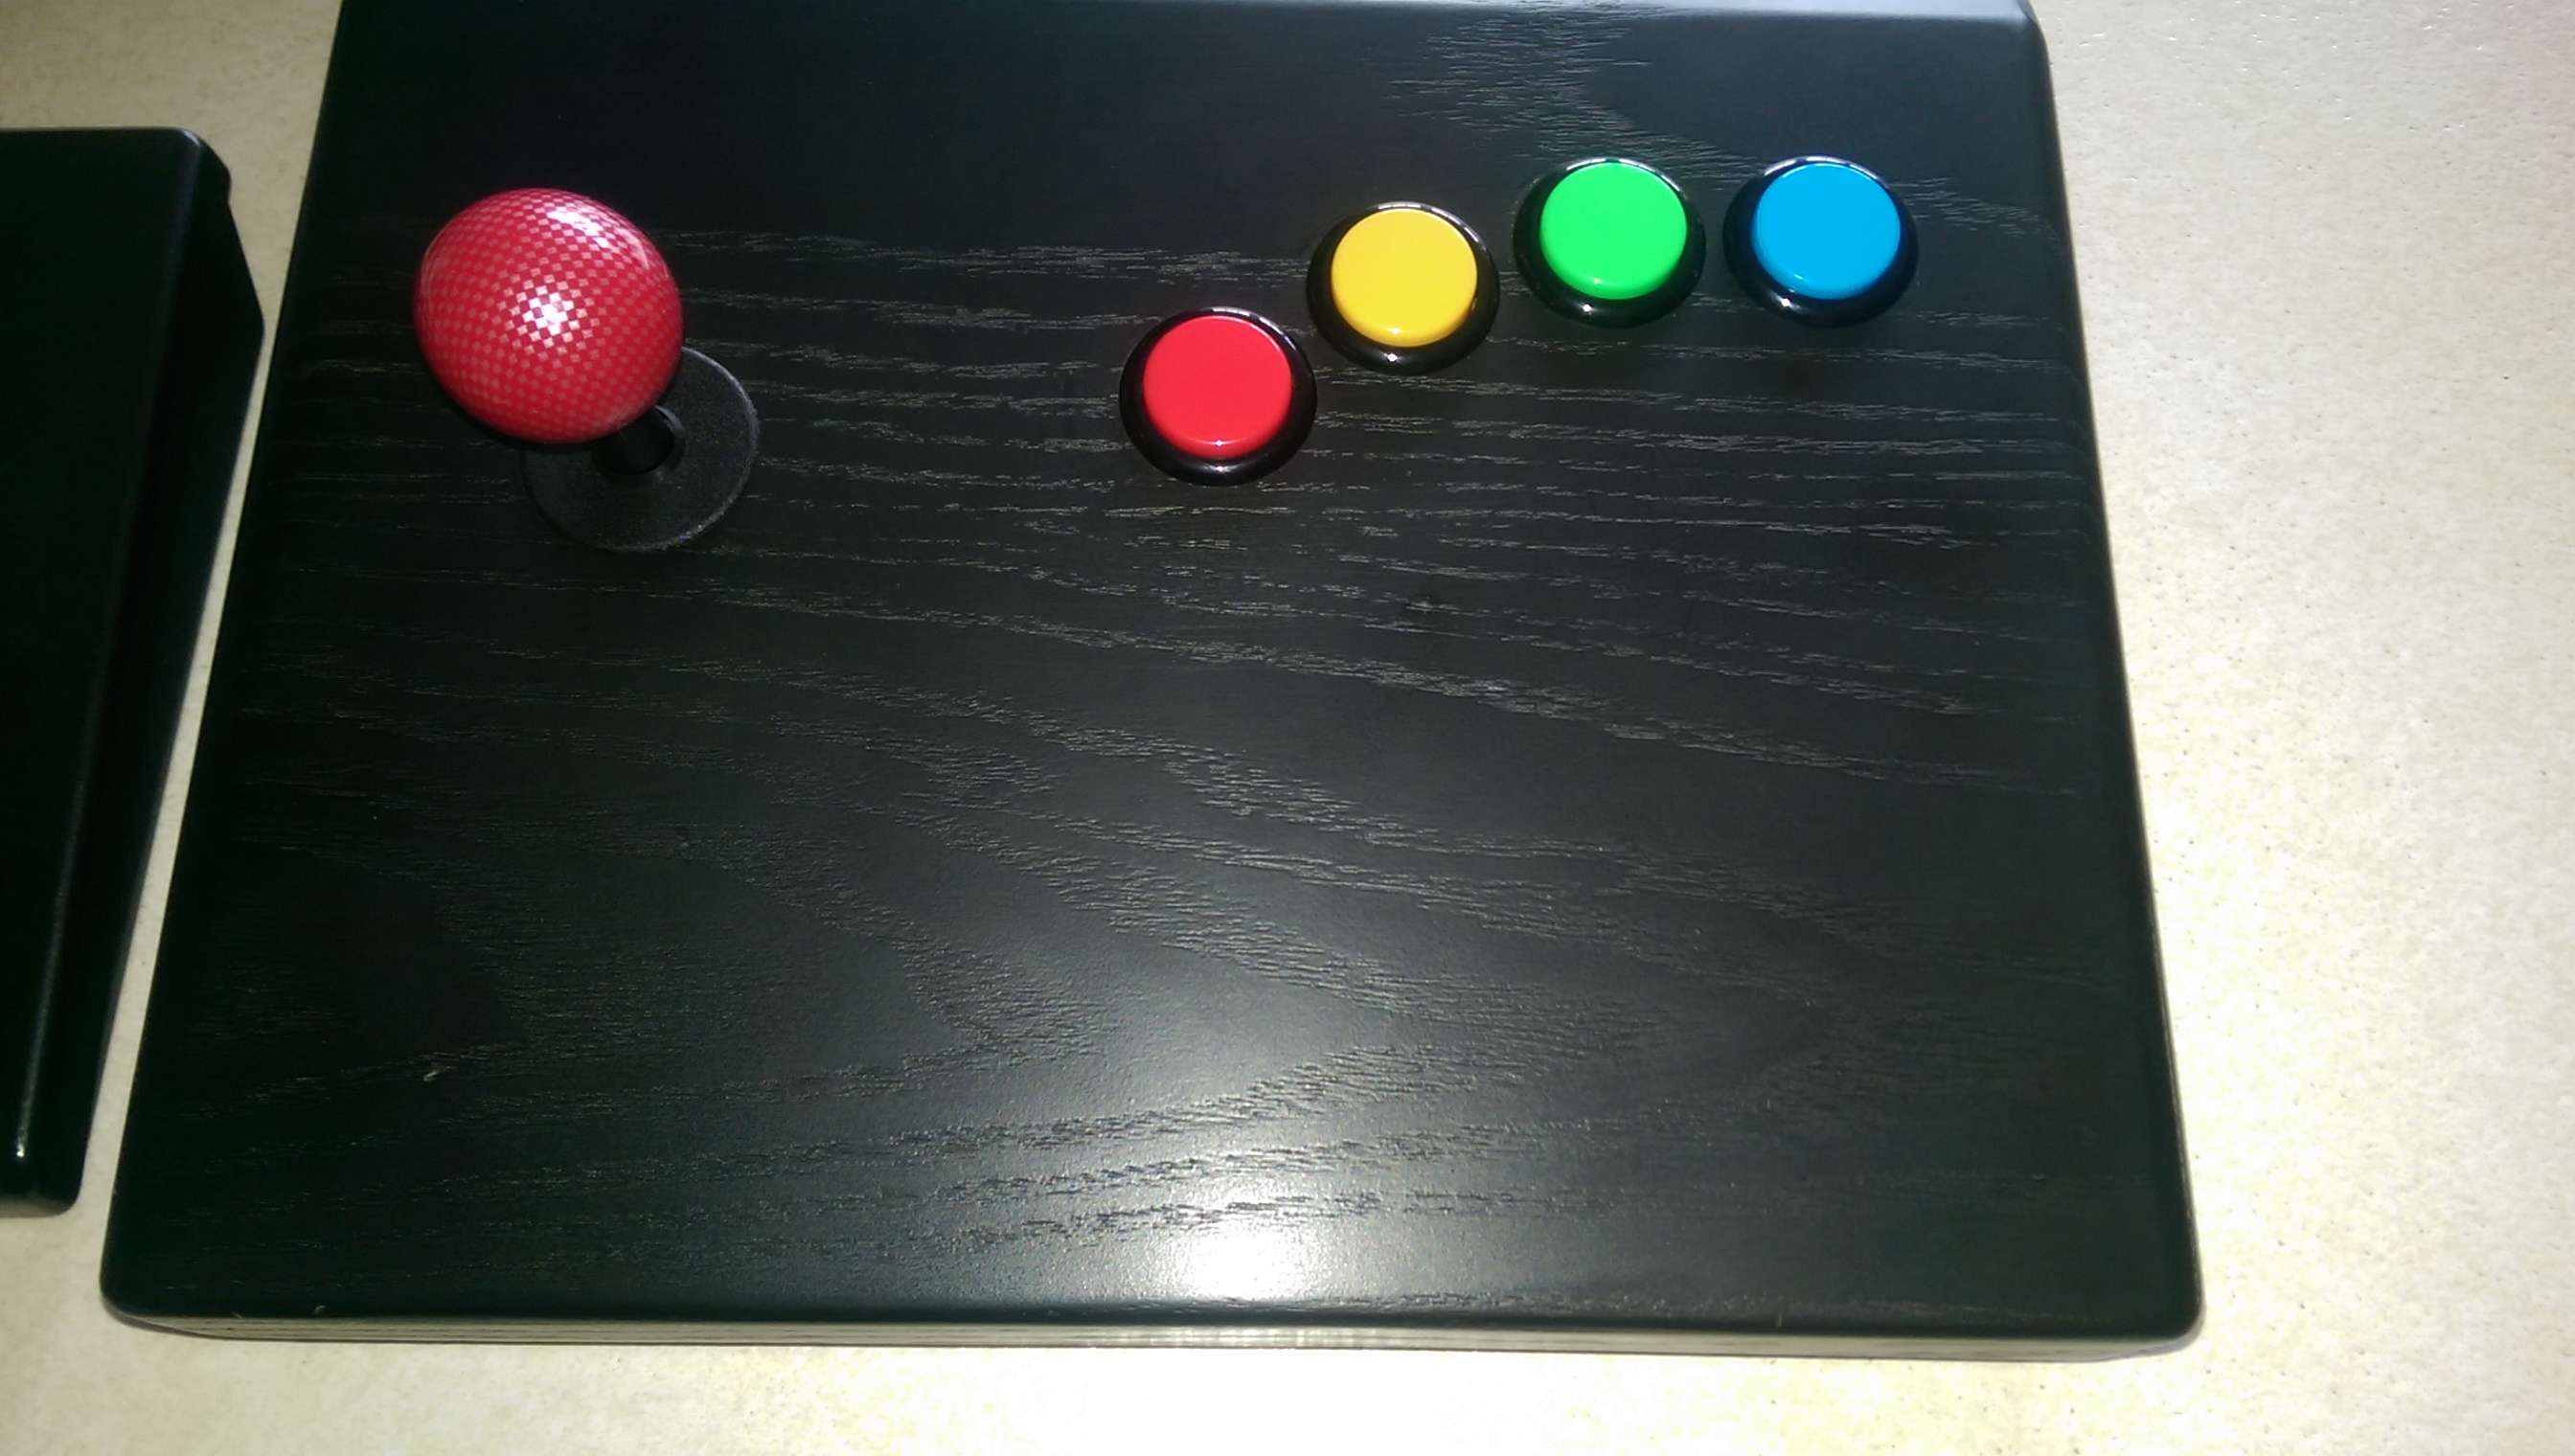
I´m considering changing buttons on one of them wooden analogue sticks. You know, the ones they sold with their cmvs things and separately.

But before I get started, I was wondering if anyone already did something like this and took pictures of the internals.

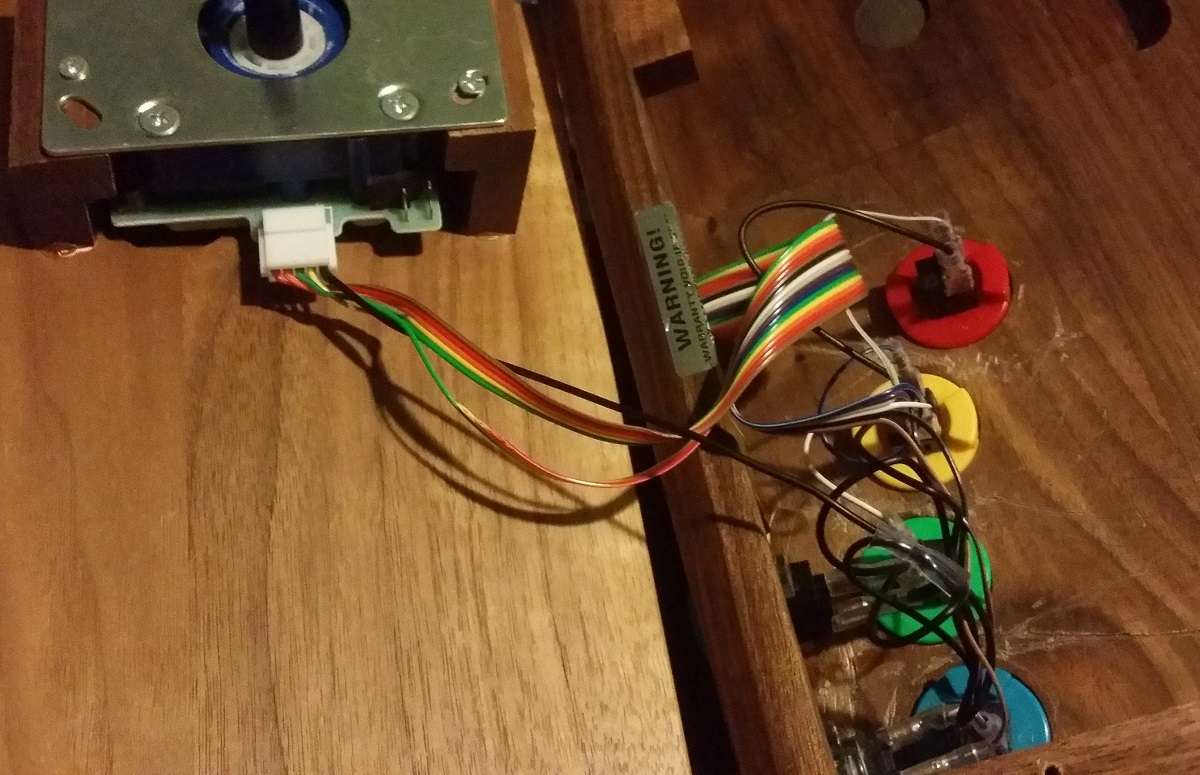
Will the damn thing fall apart and become a mess with parts that immediately hide under a sofa if I so much as unscrew this thing or is it at least somewhat neat inside?

Are the buttons a standard 2 wire per button thing or something more complicated to connect? (as in would my standard Sanwa buttons just easily plug right in?)
 
Last edited:

mjmjr25

went home to be a family man
10 Year Member
Joined
Dec 18, 2010
Posts
2,881
MCF76 opened a pair of them for certain (I have his blanks) - you can ping him and ask if he doesn't see this.
 

Mikekim

n00b
Joined
May 14, 2016
Posts
41
the buttons they use are Seimitsu PS-14-GN 30mm Screw In Arcade Buttons. the wiring inside is very neat. the ground is a single wire linking the buttons, with individual wires to the + contact.
the main PITA is the fact they hot glued the fixing rings, so getting the glue off to release the buttons is a nightmare.
I just loosened the fixing rings so i could get to the button insert tabs and changed the inserts for colored ones..
I didn't take a pic of the insides before starting, but if you want can open it up again to take a shot..
 

Mikekim

n00b
Joined
May 14, 2016
Posts
41
pic of the stick after mod..

also added a fine mesh ball top

Od6mql.jpg
 

Mendel

Vanessa's Drinking Buddy
Joined
Sep 3, 2012
Posts
1,187
That´s pretty much what I was thinking of doing except for the ball top :)
The hot glue thing sounds like bad news. Anything more you can tell about that particular nightmare, how did you loosen the fixing rings? :)
Was there a screw under some label or otherwise hidden?
 
Last edited:

MCF 76

Metal Slug Mechanic
10 Year Member
Joined
Jan 21, 2010
Posts
2,175
Hey Mendel, I do have inside pics of the sticks but I won't be able to post them until I get back from vacation next Monday. The wiring was a bit messy the DB-15's are cheap clamp through type and plastic. Really tbh I would recommend a total rewire so you can use quality parts. I had him put in translucent sanwa or Semitsu can't remember which. I bought new micro switches for the buttons and are using them still and the LS-40's in different enclosure's.
 

GohanX

Horrible Goose
20 Year Member
Joined
Sep 28, 2001
Posts
12,510
alcohol should help to loosen the hot glue. All the best for your endeavor.

Also if you have enough alcohol, you become stronger and can just brute strength it out with a sledgehammer, because that seems totally logical after a few pints.
 

Jibbajaba

Ralfredacc's Worst Nightmare
10 Year Member
Joined
Apr 30, 2009
Posts
5,611
Removing hot glue isn't that big of a deal, and you definitely shouldn't use alcohol. Just cut it as needed with a hobby knife and peel it off. Overall, replacing the buttons and stick was pretty easy. Mendel, where the fuck have you been lately?
 

DNSDies

I LOVE HILLARY CLINTON!
Joined
Mar 15, 2015
Posts
1,983
Would the alcohol would damage the wood?
I can see that it might dry it out, but that can be fixed by rubbing a wood conditioning oil on the inner surface of the wood before replacing anything you removed.

Iso alcohol is usually fantastic at removing hot glue. It just stops sticking to stuff.
 

Mendel

Vanessa's Drinking Buddy
Joined
Sep 3, 2012
Posts
1,187
Jibbajabba: For more than a year my retro stuff was pretty much unused as I was addicted to some competitive pc rts gaming. had a tournament trip to USA and what not.
Aaaand then that particular game sort of faded out and I´m back to tinkering with retro stuff :)
Also, there was a combination of things on this forum that made me a bit mad for a while. I needed a time out from here. Now I don´t really even recall what was it specifically but I guess I´m back and no harm was done really.


Anyways: There´s this nice surprise: Customer support at Analogue have found this thread and have approached me by email to help!
I almost kind of feel bad about certain youtube video I posted about the NT :D


I am being offered a pair of harnesses like this:
CXOQnmDVxmnTeG0GSCt24ZToe

(1 each for both my sticks) for free because apparently some of their older sticks (from 2012) would otherwise require soldering to mod.
I´m not going to say no to free stuff :)
They are also saying this:
Feel free to let any other Analogue Arcade Stick owners know about this and they can contact us for a free set, too.


edit: Idiot question (since I still havent opened my stick up)
Is there just a harness inside the wood box or is there some kind of circuit board? I´m not sure I understand how this works :D
 
Last edited:

Mendel

Vanessa's Drinking Buddy
Joined
Sep 3, 2012
Posts
1,187
I opened the stick.

4 screws were visible that didnt need to get opened.

4 more screws were under rubber feet that needed to be removed in order to open the stick.

Inside there was hard soldered wires to all the buttons and the stick. also plenty of hot glue. a jump wire of sort is soldered running through all the ground contacts of buttons.

Yeah I´ll wait for the replacement harness for sure :)
 

Mendel

Vanessa's Drinking Buddy
Joined
Sep 3, 2012
Posts
1,187
so I thought I´d get a head start on removing the hot glue so the final process of changing the buttons would be simpler. Well I kind of broke one of the original wires while trying to scratch off the hot glue... So I ended up pulling all the wires out of the way then to get the hot glue mess out of the way in a bit easier way. Managed to remove all the buttons eventually. So, now I´ll just wait for a new harness.

One problem is that I will also need to order a new seimitsu / sanwa stick or else I will have to unsolder some of the solder residue off of the joystick pins. The pins wont otherwise fit in any connector.

Another problem is that I dont have any soldering iron at the moment but yeahhh... we´ll see how this goes.

anyways right now the result is that the stick looks rather nasty inside but that wont be visible outside so whatever.
 

miisalo

Astra Superstar
Joined
Jan 3, 2014
Posts
669
Just come to my meeting on August and let me fix it then, you have broken enough hardware already :D
 

Xian Xi

JammaNationX,
15 Year Member
Joined
Dec 1, 2005
Posts
27,750
One problem is that I will also need to order a new seimitsu / sanwa stick or else I will have to unsolder some of the solder residue off of the joystick pins. The pins wont otherwise fit in any connector.

Wait, what? So there is no connector on the joystick header just wires soldered directly to the pins?
 

Mendel

Vanessa's Drinking Buddy
Joined
Sep 3, 2012
Posts
1,187
Yeah, that´s how it was. 5 wires directly soldered to the pins of the stick.

Now there are no more wires as I kind of wiggled them until they came loose and pulled them off.

There was no connector.
 

MCF 76

Metal Slug Mechanic
10 Year Member
Joined
Jan 21, 2010
Posts
2,175
Wait, what? So there is no connector on the joystick header just wires soldered directly to the pins?

Yeah mine were like that also. Remember last year James i sent you just the bare LS-40 sticks? You had to desolder the old stick header connector and put two new ones on for me.
 

Xian Xi

JammaNationX,
15 Year Member
Joined
Dec 1, 2005
Posts
27,750
Yeah, that´s how it was. 5 wires directly soldered to the pins of the stick.

Now there are no more wires as I kind of wiggled them until they came loose and pulled them off.

There was no connector.

If you need I have the 5 pin headers that are on the stick board. You just need to desolder the old one.
 

Mendel

Vanessa's Drinking Buddy
Joined
Sep 3, 2012
Posts
1,187
So the harnesses arrived... and you know what? I was able to sort of scratch the pins of the stick with a knife such that just enough goop was removed from the pins and they FIT in the new harness connector!

I actually made it work again :D
This is unheard of.

Okay so I still need to swap the wires around on the buttons until the buttons do the right things since I had no idea about the color codes of the wires.

M51EAh.jpg

Snap in buttons dont exactly lock in like they´re supposed to but they seem to stay on well enough.
For anyone else doing this, I would still recommend screw in buttons.
(bit of scratches where some hot glue used to be but thats fine and wont be visible when the case is closed again.)
Also if anyone else´s wooden AI stick is from 2012 or so and its all hard soldered like mine used to be before I installed this harness in above pic... and if you need such a harness, they (Analogue) are extending their offer of free harness to you as well. Just contact them and you should be good to go.
 
Last edited:

xsq

Thou Shalt Not, Question Rot.,
Joined
Jan 17, 2013
Posts
7,414
Good job Mendel!


Okay so I still need to swap the wires around on the buttons until the buttons do the right things since I had no idea about the color codes of the wires.
I got one word for you: Multimeter!


if you need such a harness, they (Analogue) are extending their offer of free harness to you as well. Just contact them and you should be good to go.
Don't have one of their sticks, but I could use a free harness :keke:
 

Mendel

Vanessa's Drinking Buddy
Joined
Sep 3, 2012
Posts
1,187
Got it all sorted out, all the buttons and the stick work correctly now. Phew.
Feel of the sanwa buttons is certainly different than that of the original seimitsu ones. Not a huge adjustment though. Sanwa buttons also seem a little quieter.
 

Xian Xi

JammaNationX,
15 Year Member
Joined
Dec 1, 2005
Posts
27,750
Got it all sorted out, all the buttons and the stick work correctly now. Phew.
Feel of the sanwa buttons is certainly different than that of the original seimitsu ones. Not a huge adjustment though. Sanwa buttons also seem a little quieter.

For Neo controllers, the more quiet the button, the more gay it is.
 
Top