You are using an out of date browser. It may not display this or other websites correctly.
You should upgrade or use an alternative browser.
You should upgrade or use an alternative browser.
Hod do I wire a 5th button on my control panel?
- Thread starter verbel
- Start date
- Joined
- Jul 20, 2002
- Posts
- 4,762
I believe the 26th pin on the Harness is the Push 5 on the 1st player and the one below it should be for the 2nd players 5 button.
wire up and ground both buttons and mount them in your panel and you should be fine.
As for wiring the button itself....you should be able to see it yourself by looking at the other buttons...as the ground will go to all buttons and the action will go directly from each button to the harness pins for the needed item.....that aren't on either FAR end.
This link explains buttons if you need it:
http://www.arcadecontrols.com/arcade_wiring.shtml
Is you cab multislot? or one slot? meaning MVS or Jamma
get your buttons from Happ or even better, from www.therealbobroberts.com
Last edited:
- Joined
- Jul 20, 2002
- Posts
- 4,762
you could use anything from 18-22 guage and you should be fine and a 15 watt soldering iron.
The Jamma harness should be numbered and there will most likely be numbers on the top half and letters on the bottom.
The manual you get will have an outline of the harness, but there is one in the thread on this tech forum for the Atomiswave system.
Here's is what the buttons I used look like on the switch part:
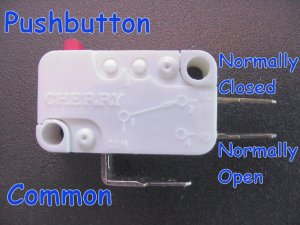
What I did is put the ground wire to the NormalyOpen part of the switch. The wire for ground can then be connected directly to the ground pins on the harness. The ground pins on the harness are 1,2 and 27,28 as well as the pins directly below those exact numbers on the harness.
I don't know why the common isn't for ground and the NO isn't for the button, but I hooked up an arcade stick exactly like this and it works great!
Then, take another wire and hook it to the part on the button in the picture labeled Common. Take that wire and for the button on the player one side of the arcade controls, and connect it directly to the 26 pin on the harness. Do the same thing for the 2nd player, but connect it the pin directly under the 26 pin on the harness, which will be a letter.
mount the buttons in the controls and you are set....
you will have to drill 2 holes in your arcade cab's controls...
hope this helps")
The Jamma harness should be numbered and there will most likely be numbers on the top half and letters on the bottom.
The manual you get will have an outline of the harness, but there is one in the thread on this tech forum for the Atomiswave system.
Here's is what the buttons I used look like on the switch part:
What I did is put the ground wire to the NormalyOpen part of the switch. The wire for ground can then be connected directly to the ground pins on the harness. The ground pins on the harness are 1,2 and 27,28 as well as the pins directly below those exact numbers on the harness.
I don't know why the common isn't for ground and the NO isn't for the button, but I hooked up an arcade stick exactly like this and it works great!
Then, take another wire and hook it to the part on the button in the picture labeled Common. Take that wire and for the button on the player one side of the arcade controls, and connect it directly to the 26 pin on the harness. Do the same thing for the 2nd player, but connect it the pin directly under the 26 pin on the harness, which will be a letter.
mount the buttons in the controls and you are set....
you will have to drill 2 holes in your arcade cab's controls...
hope this helps
Last edited:
- Joined
- Jul 20, 2002
- Posts
- 4,762
lol, no question is stupid...well, at least none of these If you have never done something before, IMO, the best way to find out how is to ask someone. I have been there 100's of times...and before my first and only arcade stick made from scratch....I asked these very same questions.
no worries at all...
Remeber, TIN EVERYTHING!
meaning: melt a little bit of solder on the spot you are going to connect the wire to and then melt a little bit of solder on the wire itself. That's tinning, if you didn't already know that. I had to find that out on these boards by asking Anyways, this way you can just hold the wire to the spot, put the iron (NOT GUN!) to the spot and the wire and the solder turns shines...pull away the iron and hold the wire. The solder turns dull looking again, but keep holding it for a second...then it should be on good enough. If you don't tin stuff, you risk having a cold solder, which is much more likely to come apart.
Easy as that
sorry if you already knew about that, but I didn't at first and it helped me LOADS!!! It makes soldering jobs much easier and a lot cleaner!
If you have never done something before, IMO, the best way to find out how is to ask someone. I have been there 100's of times...and before my first and only arcade stick made from scratch....I asked these very same questions. no worries at all...
Remeber, TIN EVERYTHING!
meaning: melt a little bit of solder on the spot you are going to connect the wire to and then melt a little bit of solder on the wire itself. That's tinning, if you didn't already know that. I had to find that out on these boards by asking
Anyways, this way you can just hold the wire to the spot, put the iron (NOT GUN!) to the spot and the wire and the solder turns shines...pull away the iron and hold the wire. The solder turns dull looking again, but keep holding it for a second...then it should be on good enough. If you don't tin stuff, you risk having a cold solder, which is much more likely to come apart. Easy as that
sorry if you already knew about that, but I didn't at first and it helped me LOADS!!! It makes soldering jobs much easier and a lot cleaner!
OmegaSaber
Beast Buster

- Joined
- May 18, 2003
- Posts
- 2,109
If you don't care to solder stuff then you can also crimp them on. My candy cab has everything crimped.
OmegaSaber
Beast Buster
- Joined
- May 18, 2003
- Posts
- 2,109
verbel said:what all do I need to crimp stuff on?
To be honest I'm not sure because my stuff was already like that, but I do know Radio Shack sells crimping kits with the tool and pieces to crimp with. I assume that will have everything you need.
- Joined
- Jul 20, 2002
- Posts
- 4,762
well, that all depends on what type of jamma harness you have. There is the crimp type and there is the solder type. I have never seen crimp stuff on buttons but haven't seen the inside of many cabs either. You are only putting in two buttons and that's only 8 solder spots total. IMO, that shouldn't be too tough...even for someone with no soldering experience. 2 wires per button and 2 ends per wire.... not much to it.
Open up your cab and see what has been used in there. If the Harness is the solder type, you are most likely going to have to solder the 4 wires to it.
Use the tinning method above and you should be fine...
step by step
take the end of you soldering iron and get a small amount of solder on it...then touch the iron's tip to the 26 pin on the harness. The solder should tranfer to the pin after about a second. Then, touch the solder to the 3/16 of an inch stripped end of the wire....then place the soldering iron between the two until the solder covers the end of the wire pretty well. Then, do this to all of the "d" pin on the harness(LOWERCASE "d") ,which will be directly below the 26 pin. Do the same thing with 2 ground pins and the rest of the wires.
Once everything has been tinned, you can set that stuff aside while you find a drill bit that is the size of the screw in portion of the buttons you are going to install. Make sure your hole is not bigger then the piece that will screw onto the button from the bottom or the outer rim or the top of the button, so your button will stay in place on the board. (sorry, not to be insulting, but I like to cover all the angles)... Mount in your buttons and plug the switch part into the bottom of the buttons with the common piece on the outer end of the button. Tin the solder spots on the switch parts of the button, which is what is pictured in one of my above post.
Now you are ready to connect the wires...
Ground goes to the Normally Open pin on the switch and the push 5 wire goes to the Common part of the switch. ...as labeled on the picture above!
Remember, 1st player goes to pin "26" and 2nd to pin "d"
IMO, you should be able to mount the 2 buttons and install them in about 15-20 minutes tops....but take your time")
Good luck! and make sure to throw up some pictures when you're done.
ttyl,
ngt
Open up your cab and see what has been used in there. If the Harness is the solder type, you are most likely going to have to solder the 4 wires to it.
Use the tinning method above and you should be fine...
step by step
take the end of you soldering iron and get a small amount of solder on it...then touch the iron's tip to the 26 pin on the harness. The solder should tranfer to the pin after about a second. Then, touch the solder to the 3/16 of an inch stripped end of the wire....then place the soldering iron between the two until the solder covers the end of the wire pretty well. Then, do this to all of the "d" pin on the harness(LOWERCASE "d") ,which will be directly below the 26 pin. Do the same thing with 2 ground pins and the rest of the wires.
Once everything has been tinned, you can set that stuff aside while you find a drill bit that is the size of the screw in portion of the buttons you are going to install. Make sure your hole is not bigger then the piece that will screw onto the button from the bottom or the outer rim or the top of the button, so your button will stay in place on the board. (sorry, not to be insulting, but I like to cover all the angles)... Mount in your buttons and plug the switch part into the bottom of the buttons with the common piece on the outer end of the button. Tin the solder spots on the switch parts of the button, which is what is pictured in one of my above post.
Now you are ready to connect the wires...
Ground goes to the Normally Open pin on the switch and the push 5 wire goes to the Common part of the switch. ...as labeled on the picture above!
Remember, 1st player goes to pin "26" and 2nd to pin "d"
IMO, you should be able to mount the 2 buttons and install them in about 15-20 minutes tops....but take your time
Good luck! and make sure to throw up some pictures when you're done.
ttyl,
ngt
verbel
Krauser's Shoe Shiner

- Joined
- Sep 18, 2003
- Posts
- 232
Hey NGT I saw some of your posts on the supergun forums I'm kinda thinking of trying to make one and you seem to know some about that stuff. Do you think It would be very difficult to make one that I can use with both the atomiswave and a MVS. I have a few othe PCB's Id like to use with it as well but they are not as important as to ones above.
- Joined
- Jul 20, 2002
- Posts
- 4,762
well, if you are worried about soldering 4 wires, then the supergun might be a bit too much...
but the SGR is great for help with that stuff and IMO, anyone can make a supergun if they know what goes where.
The thing with your idea is, I don't know what type of powersupply you would need with the Atomiswave. I know it doesn't use -5v, but not sure if the external powersupply I use for mine would be right for that and if it would be ok for the mvs stuff as well. It could very well work out being the same exact one, but I really don't know as I don't have an Atomiswave. You may want to talk with supergoose, as I think he has an Atomiswave already.
IMO, throw the atomiswave in the cab and just switch them in there....
but if you are up for the project....the two main things to consoder would be the powersupply and how to get a 5 button controller up and running on your supergun. I don't think the controller would be tough, but you would have to wire the 26 pin to one of the NoConnects on the db15 for first player the "d" pin for the 2nd player to the same no connect on the player 2 db15. Then make you own arcade controllers and wire their plugs accordingly.
It sounds like quite a job, but if you're up for it I say go for it
One thing is for sure... when you are done you will be good at soldering,lol...
verbel
Krauser's Shoe Shiner
- Joined
- Sep 18, 2003
- Posts
- 232
Cool, Im not really worried about sodering I just want to be well informed before I do it and make sure I dont fry anything important. I think I can handle it though. I am just going to use my cabinet for now but, Im in the AirForce and lugging this cab around every time I have to move no matter how much I like it Is a huge pain in the butt with a supergun that would solve alot of problems. I'm starting to gather some of the parts for the project I think I can do it but its going to take me quite a while to do it. I have plenty of time to get the parts though cause Im getting deployed next month So I wont be able to work on it.
- Joined
- Jul 20, 2002
- Posts
- 4,762
hey, If you are up for it then cool! IMO, if supergoose says that you can use the sc200 powersupply from Jameco for the Atomiswave then it wont be that hard to make the supergun. The controllers might take some work though, but as far as being different from a normal supergun, the 5th button will only be 2 more wires inside the supergun and two extra wires inside each of your home made arcade sticks....that you will need to make for that fifth button support.... unless you feel like really having some fun....as you could mod SNES pads and have one of the top buttons as your 5th button.
IMO, it sounds like a lot of fun and if I had the time....and an Atomiswave (lol) I would do the same exact thing....just to do it.
oh, and goodluck out there in the field!!
IMO, it sounds like a lot of fun and if I had the time....and an Atomiswave (lol) I would do the same exact thing....just to do it.
oh, and goodluck out there in the field!!
iamrandyray
Armored Scrum Object

- Joined
- Mar 10, 2001
- Posts
- 259
is only 2 ground on the last row on the jamma harness enough
if i have 6 button configs
thanks
if i have 6 button configs
thanks