
- Joined
- Oct 3, 2006
- Posts
- 6,780
I've had several members show interest in this, so I thought I would post a guide for you technically inclined folks to try for yourself. So anyways, lets begin shall we!
Before you begin! Make sure you have a basic understanding as to how electronics work, and how to service them, including soldering. If you don't feel comfortable doing this to your Neo, don't do it, simple as that.
Also, this guide is for the early-revision AES console only! (see below)
There is one other major revision that has not been tested and this guide does not apply to it! This console's serial # is 015662.
There are some incompatibility issues with some games, so this guide will show you how to install a switch so you can select between stock and overclocked modes.
______________________________________________________
-Overclocking F.A.Q.-
Q: Does this kill my system or shorten it's lifespan?
A: No. This misconception has been brought on by the PC overclocking world. Increases in CPU voltage input and Heat are the only damaging elements to a CPU. The Neo Geo's 68000 CPU barely runs hotter than room tempurature with even the most extreme overclock.
Q: Won't the games run in fast-forward?
A:This is the most frequently-asked question regarding overclocking. Overclocking does not physically speed up the gameplay beyond the speed of a stock game system.
______________________________________________________
-some basic parts you will need:-
*4-pin metal can crystal oscillator. This is where your new CPU speed will come from since it generates the clock frequency that is marked on the top of the piece. So if you find an oscillator that says "14.000MHz", when installed, your Neo will run at 14.000 MHz. Make sure you find an oscillator that is within reason and not something obserd like 40 MHz. (most small electronics stores will have these. Radioshack does not).
*A small amount of solid core wire for VCC and GND, as well as a thin wire for the clock signal. A single wire from an IDE cable works perfectly for the clock wire.
*An X-Acto knife
*A small set of clippers
*A 2-position, 3-pin toggle switch
______________________________________________________
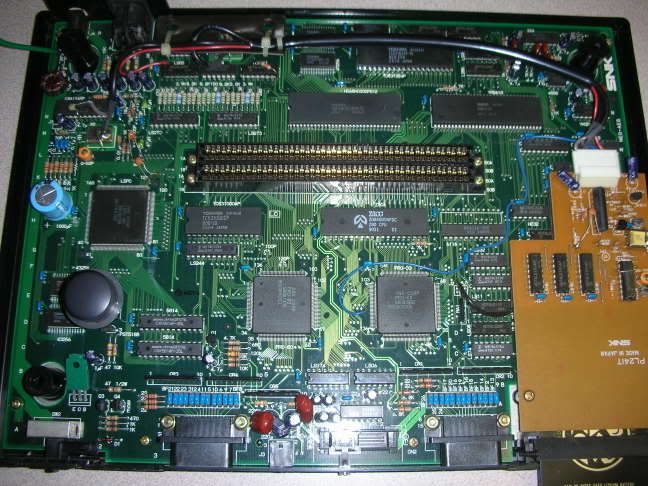
OK I assume anyone trying this already knows how to open your AES, so we'll skip that. Looking at the motherboard, the CPU (a Motorola or Toshiba 68HC000) is located above the cartridge slot. This is what we will be working with (see below in red).

Step 1: Prepping the CPU. Now, locate pin #15 on the CPU as this is the Clock input pin. This is where it can get tricky and a little nerve-wrecking, you will need to detach pin 15 from the motherboard in order to disconnect the CPU from the 12 MHz clock signal. I've found that it's easier to clip the pin close to the board as possible and raise it *slowly* with an X-Acto knife. If that pin breaks off of the CPU, your AES is done. Be extremely careful doing this!!
If your done with that, make sure your raised pin is not touching the other pins next to it or anything else. Carefully hook up your Neo and verify that it *DOES NOT BOOT*. If it does not boot a game, then you can move on to the next step.
_____
Step 2: Wiring the Oscillator for power. Step 1 is the hardest part, so pat yourself on the back for finishing it") . Now we need to take your 4-pin metal oscillator and install it. What we are also going to do is install a switch that will allow for stock 12 MHz operation as well as overclocked operation.
. Now we need to take your 4-pin metal oscillator and install it. What we are also going to do is install a switch that will allow for stock 12 MHz operation as well as overclocked operation.
Looking at your oscillator, note the corner that has a small black dot. Now with that noted, look at the diagram below to see how we will have to wire this into the console (Note, this is a generic diagram and "10 MHz" is your clock output pin):

Now we need to find a source for a Ground and +5V. Finding a ground is pretty simple and not worth mentioning. If you need help finding a good ground point shoot me a PM. As for +5V, this is pretty simple as well, we will be pulling it from the voltage regulator located below the RESET button. Looking at the front of the console, you will want to hook up your +5V line to the left pin. See below:
Picture of Voltage Regulator with +5V wire attached.
Step 3: Wiring up the clock signal wires.
OK, so you have your Ground and +5V wired up to the oscillator, now lets wire up our clock signals and install our speed selection switch. Use your small wires for clock signals!! What we will do is run a wire from a point on the board where the original 12 MHz signal can be accessed, to one end of your switch, and a wire from our oscillator to the other end, with the middle pin (common) going to the raised CPU pin.
Our 12 MHz signal can be accessed on the underside of the board where pin 15 on the CPU was located. Simply attach a wire to the solder pad and reinstall your motherboard in it's case with the wire ready to attach to your switch (pic below):
Click to see the CPU pins on the backside of the motherboard.
Click here to see a closer view of the CPU pins on the underside of the motherboard.
Click here to see a photo of how everything should be installed.
Last, make sure your oscillator is mounted so it won't move around inside the console. Hot glue works great!
Triple check everything to ensure it's all installed properly!! If you are uncertain about anything please send me a PM and I will help you out.
OK, mount your switch how you'd like, put it all back together, and test it out! You should have a Neo that can run in stock and Uber mode!!
VIDEO: Metal slug 2 @ 16 MHz. Right-click, save-as
______________________________________________________
Any questions you have post them here! Also, if you've done this don't be afraid to post your results. I would like to compile a list of compatible/incompatible games once enough people give this a try. Oh, and Razoola, your Unibios 2.3 works flawlessly at 16 MHz
Before you begin! Make sure you have a basic understanding as to how electronics work, and how to service them, including soldering. If you don't feel comfortable doing this to your Neo, don't do it, simple as that.
Also, this guide is for the early-revision AES console only! (see below)
There is one other major revision that has not been tested and this guide does not apply to it! This console's serial # is 015662.
There are some incompatibility issues with some games, so this guide will show you how to install a switch so you can select between stock and overclocked modes.
______________________________________________________
-Overclocking F.A.Q.-
Q: Does this kill my system or shorten it's lifespan?
A: No. This misconception has been brought on by the PC overclocking world. Increases in CPU voltage input and Heat are the only damaging elements to a CPU. The Neo Geo's 68000 CPU barely runs hotter than room tempurature with even the most extreme overclock.
Q: Won't the games run in fast-forward?
A:This is the most frequently-asked question regarding overclocking. Overclocking does not physically speed up the gameplay beyond the speed of a stock game system.
______________________________________________________
-some basic parts you will need:-
*4-pin metal can crystal oscillator. This is where your new CPU speed will come from since it generates the clock frequency that is marked on the top of the piece. So if you find an oscillator that says "14.000MHz", when installed, your Neo will run at 14.000 MHz. Make sure you find an oscillator that is within reason and not something obserd like 40 MHz. (most small electronics stores will have these. Radioshack does not).
*A small amount of solid core wire for VCC and GND, as well as a thin wire for the clock signal. A single wire from an IDE cable works perfectly for the clock wire.
*An X-Acto knife
*A small set of clippers
*A 2-position, 3-pin toggle switch
______________________________________________________
OK I assume anyone trying this already knows how to open your AES, so we'll skip that. Looking at the motherboard, the CPU (a Motorola or Toshiba 68HC000) is located above the cartridge slot. This is what we will be working with (see below in red).
Step 1: Prepping the CPU. Now, locate pin #15 on the CPU as this is the Clock input pin. This is where it can get tricky and a little nerve-wrecking, you will need to detach pin 15 from the motherboard in order to disconnect the CPU from the 12 MHz clock signal. I've found that it's easier to clip the pin close to the board as possible and raise it *slowly* with an X-Acto knife. If that pin breaks off of the CPU, your AES is done. Be extremely careful doing this!!
If your done with that, make sure your raised pin is not touching the other pins next to it or anything else. Carefully hook up your Neo and verify that it *DOES NOT BOOT*. If it does not boot a game, then you can move on to the next step.
_____
Step 2: Wiring the Oscillator for power. Step 1 is the hardest part, so pat yourself on the back for finishing it
. Now we need to take your 4-pin metal oscillator and install it. What we are also going to do is install a switch that will allow for stock 12 MHz operation as well as overclocked operation.Looking at your oscillator, note the corner that has a small black dot. Now with that noted, look at the diagram below to see how we will have to wire this into the console (Note, this is a generic diagram and "10 MHz" is your clock output pin):
Now we need to find a source for a Ground and +5V. Finding a ground is pretty simple and not worth mentioning. If you need help finding a good ground point shoot me a PM. As for +5V, this is pretty simple as well, we will be pulling it from the voltage regulator located below the RESET button. Looking at the front of the console, you will want to hook up your +5V line to the left pin. See below:
Picture of Voltage Regulator with +5V wire attached.
Step 3: Wiring up the clock signal wires.
OK, so you have your Ground and +5V wired up to the oscillator, now lets wire up our clock signals and install our speed selection switch. Use your small wires for clock signals!! What we will do is run a wire from a point on the board where the original 12 MHz signal can be accessed, to one end of your switch, and a wire from our oscillator to the other end, with the middle pin (common) going to the raised CPU pin.
Our 12 MHz signal can be accessed on the underside of the board where pin 15 on the CPU was located. Simply attach a wire to the solder pad and reinstall your motherboard in it's case with the wire ready to attach to your switch (pic below):
Click to see the CPU pins on the backside of the motherboard.
Click here to see a closer view of the CPU pins on the underside of the motherboard.
Click here to see a photo of how everything should be installed.
Last, make sure your oscillator is mounted so it won't move around inside the console. Hot glue works great!
Triple check everything to ensure it's all installed properly!! If you are uncertain about anything please send me a PM and I will help you out.
OK, mount your switch how you'd like, put it all back together, and test it out! You should have a Neo that can run in stock and Uber mode!!
VIDEO: Metal slug 2 @ 16 MHz. Right-click, save-as
______________________________________________________
Any questions you have post them here! Also, if you've done this don't be afraid to post your results. I would like to compile a list of compatible/incompatible games once enough people give this a try. Oh, and Razoola, your Unibios 2.3 works flawlessly at 16 MHz
Last edited:
")