Dean
Choi's Clawmaker

- Joined
- Jan 26, 2003
- Posts
- 4,821
Haha, not the biggest new in my world, which would be the Turbo Duo sound fix, but this is the other scourge of the Turbo World!
I was discussing the problems with Duo units with TZD's Steve Garwood and he mentioned that by far and away the biggest problem for them has been weak/no sound from Turbo Express units, even brand new ones! So I asked if he could send a unit of two and I'd look into it. Tried contacting RetroGames Bob Frasure, but no luck (still, if anyone has a way to contact him please let me know!). So off I went with the multimeter.
So I sat with a TE with a weak speaker and started tracing the circuit back, looking for the culprit which I figured had to be a dead/dry capacitor or dead op amp IC. Since there is a dense mask on the system, I had to do a lot of scraping and shining of light through the PCB to find the contacts. Here's what that looked like:
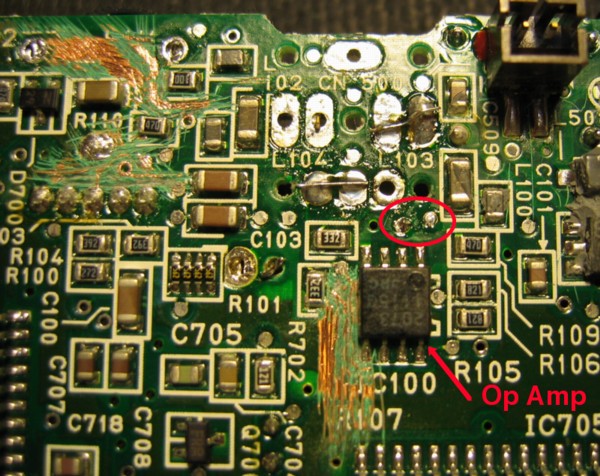
Notice the Op Amp for the sound highlighted and two little holes through the PCB. These holes are the + and - of a capacitor that leads to the input into the op amp for the audio are also tied to the speaker line which is just above the "03" in L103 on the PCB. Those holes are connected to this capacitor:
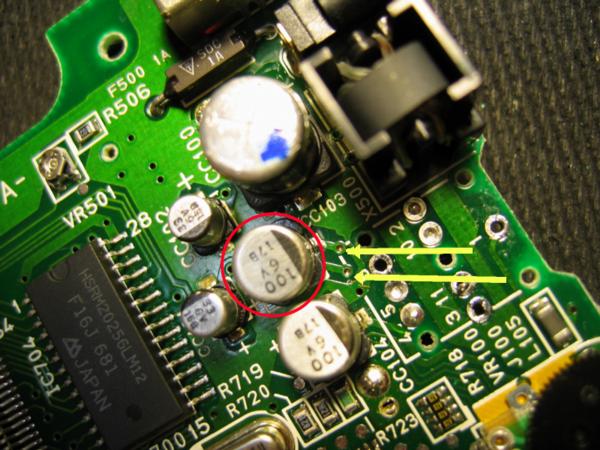
So, I figured, likely culprit. I tapped a new 100 uF, 25 Volt capacitor to the proper holes and SUCCESS@!!@!! The sound amplified to a normal level!!!!!! What I've noticed is that there are varying degrees of the sound issue from weak sound to no sound. This mod works with both and even in the worse case it is amped to a satisfactory level. Meaning there is likely another cap somewhere that needs looking at, but this fix will definitely work.
Here's step-by-step instructions on how to do this. If you copy the location of the image I have and simply remove the "a" that's after the number, before the ".jpg", then you will get the 800 x 600 version.
All these are in this folder on my site:
http://www.multimods.com/TEsound/
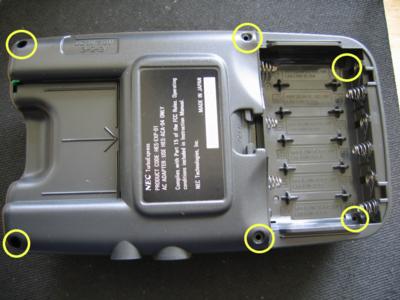
OK, on the back of your TE, remove the 4 screws on the outside and the two inside the battery compartment:
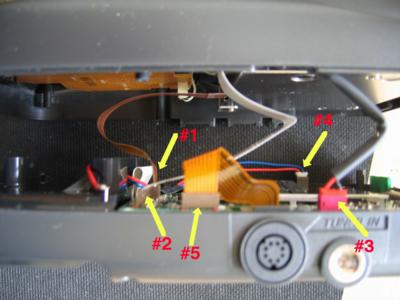
CAREFULLY separate the front and back of the unit enough that you can disconnection these connections. The flat cables should be wiggled gently back and forth to make them loose.
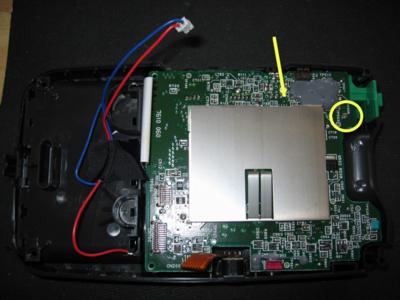
On the rear part of the unit, remove the screw indicated in the pic. Note that the two holes we're soldering too are located where the arrow is pointing:
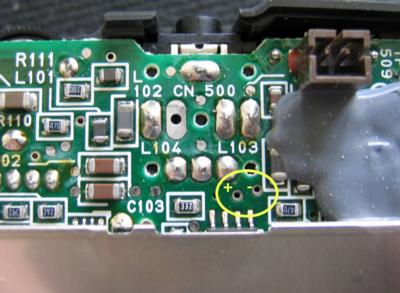
Closeup of the holes with + and - indicated.
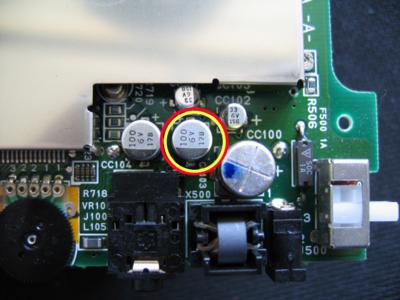
Here's the culprit. You can twist the cap off with a pair of pliers but leaving it in is no problem.
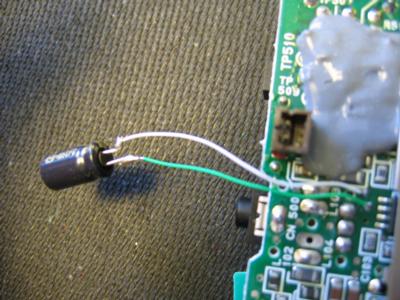
Now take an electrolytic 100uF cap (25 V is what I used, but you can use 10V, 15V, etc) and connect two wires to it, preferably close to the cap body as shown so most of the wire and terminals are coved by insulation. I used wrapping wire (30 gauge), but you can use 22 gauge, which is pushing it on how small the spots you're soldering too are. Wires should be about 1.5-2" long.

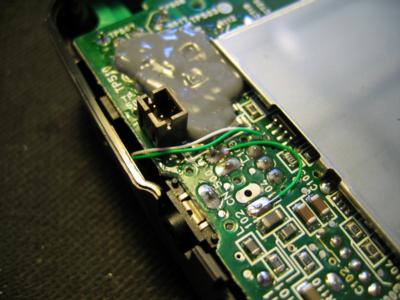
And now connected:
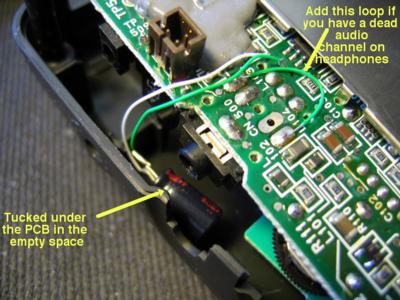
Here I've tucked the cap under the PCB where there is ample space to hold it. Note in the picture I have also added a short wire between two places on the PCB. This is connecting the right and left channels on this unit since the right channel was dead. I'm sure the issue with it can be solved, but this works great for addressing the problem at hand.
Now with the PCB reset to it's place, note the location of the wires. All you have to do now is screw in the proper screws and reconnect the cables (carefully! I use needlenose pliers for the flat cables so I don't bend them) and you're done!!!
So, there it is. You can buy the capacitor dirt cheap in packs of 10-100 from DigiKey or Jameco and even Radio Shack has the capacitor. All you need after that is 3" of wire and soldering equipment. Oh, and a small Phillips head screwdriver.
If you need yours fixed, I will probably start offering to fix them for people shortly. Shipping plus maybe $10 for the fix. So about $20 shipped back to you (you pay shipping out, and then it's about $10 back to you). I figure there are a lot of people that are nervous about soldering such small connections and opening anything electronic like this, so I'll probably offer to do this. We shall see on this, but most importantly I wanted to make this available for everyone!
Next biggy, and the one I'm most passionate about, the Duo sound issue!!!
I was discussing the problems with Duo units with TZD's Steve Garwood and he mentioned that by far and away the biggest problem for them has been weak/no sound from Turbo Express units, even brand new ones! So I asked if he could send a unit of two and I'd look into it. Tried contacting RetroGames Bob Frasure, but no luck (still, if anyone has a way to contact him please let me know!). So off I went with the multimeter.
So I sat with a TE with a weak speaker and started tracing the circuit back, looking for the culprit which I figured had to be a dead/dry capacitor or dead op amp IC. Since there is a dense mask on the system, I had to do a lot of scraping and shining of light through the PCB to find the contacts. Here's what that looked like:
Notice the Op Amp for the sound highlighted and two little holes through the PCB. These holes are the + and - of a capacitor that leads to the input into the op amp for the audio are also tied to the speaker line which is just above the "03" in L103 on the PCB. Those holes are connected to this capacitor:
So, I figured, likely culprit. I tapped a new 100 uF, 25 Volt capacitor to the proper holes and SUCCESS@!!@!! The sound amplified to a normal level!!!!!! What I've noticed is that there are varying degrees of the sound issue from weak sound to no sound. This mod works with both and even in the worse case it is amped to a satisfactory level. Meaning there is likely another cap somewhere that needs looking at, but this fix will definitely work.
Here's step-by-step instructions on how to do this. If you copy the location of the image I have and simply remove the "a" that's after the number, before the ".jpg", then you will get the 800 x 600 version.
All these are in this folder on my site:
http://www.multimods.com/TEsound/
OK, on the back of your TE, remove the 4 screws on the outside and the two inside the battery compartment:
CAREFULLY separate the front and back of the unit enough that you can disconnection these connections. The flat cables should be wiggled gently back and forth to make them loose.
On the rear part of the unit, remove the screw indicated in the pic. Note that the two holes we're soldering too are located where the arrow is pointing:
Closeup of the holes with + and - indicated.
Here's the culprit. You can twist the cap off with a pair of pliers but leaving it in is no problem.
Now take an electrolytic 100uF cap (25 V is what I used, but you can use 10V, 15V, etc) and connect two wires to it, preferably close to the cap body as shown so most of the wire and terminals are coved by insulation. I used wrapping wire (30 gauge), but you can use 22 gauge, which is pushing it on how small the spots you're soldering too are. Wires should be about 1.5-2" long.
And now connected:
Here I've tucked the cap under the PCB where there is ample space to hold it. Note in the picture I have also added a short wire between two places on the PCB. This is connecting the right and left channels on this unit since the right channel was dead. I'm sure the issue with it can be solved, but this works great for addressing the problem at hand.
Now with the PCB reset to it's place, note the location of the wires. All you have to do now is screw in the proper screws and reconnect the cables (carefully! I use needlenose pliers for the flat cables so I don't bend them) and you're done!!!
So, there it is. You can buy the capacitor dirt cheap in packs of 10-100 from DigiKey or Jameco and even Radio Shack has the capacitor. All you need after that is 3" of wire and soldering equipment. Oh, and a small Phillips head screwdriver.
If you need yours fixed, I will probably start offering to fix them for people shortly. Shipping plus maybe $10 for the fix. So about $20 shipped back to you (you pay shipping out, and then it's about $10 back to you). I figure there are a lot of people that are nervous about soldering such small connections and opening anything electronic like this, so I'll probably offer to do this. We shall see on this, but most importantly I wanted to make this available for everyone!
Next biggy, and the one I'm most passionate about, the Duo sound issue!!!

")