makinavaja
n00b

- Joined
- Dec 11, 2017
- Posts
- 31
Also, now I've tested with a more powerful power supply with up to 3,5Amp... nothing changes.
All of them are okOkay you have these three points between pin 19 & 20 of the bios. Check these:
NEO-DO 1 =LSPC2 PIN 5
NEO-DO 2 =LSPC2 PIN 7
NEO-DO 3 =LSPC2 PIN 8
BB
OK. This point runs under the bios and has atrace close to pin 2.
NEO-C1 96=EO PIN 61
BB
All tested and all tracks are ok.OK. I forgot to list these to points already mentioned:
These are all connections from the bios to the 68000:
PIN 4 =pIN 55 68000
PIN 5 =PIN 56 68000
PIN 6 =PIN 57 68000
PIN 7 =PIN 58 68000
PIN 8 =PIN 59 68000
PIN 9 =PIN 60 68000
PIN 10 =PIN 61 68000
PIN 12 =PIN 62 68000
PIN 13 =PIN 63 68000
PIN 14 =PIN 64 68000
PIN 15 =PIN 1 68000
PIN 16 =PIN 2 68000
BB
No, I haven't. I will try tomorrow to burn one. Its suposed that I can use the same eeproms I use for uni bios, isn't it?
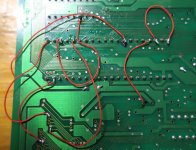
You only started to have problems once you attempted to add a socket so the problem has to be there. I would remove and replace.After you removethe socket make sure none of the connections are bridging. Pins (1,40 &39)(11&30) are already bridged on the board so you don't have to do any bridging.
BB
With the issue being triggered with light vs no light it seems like something must be up with the eproms themselves. I would try putting the stock bios back in and see what happens. If the issues doesn't happen that further points to the eproms being the cause. Whats their manufacture / model?
umm, just only thinking about desolder something again from those pins, makes me feel afraid of breaking something again, but with all the info you gave me about all the pins and connections, now that must be much easier!
But, anyway, if there is any undesired bridge there,.. why the console has been working nonstop during one hour withouth problems while my hand was far from the eeprom? :-(
Anyway, again, thank you very much for your help!! I will think about the next move now, and how to do it safely