1942 pcb not working

mikey

Marked Wolf
Joined
Jun 19, 2012
Posts
215
I have a 1942 board that isn't working. It was fine before I moved, now it doesn't display anything when I power it up. I noticed that the power LED on my supergun was dim when this particular board was plugged in. I tested the board and found that the 5v line only has 68ohms of resistance to ground right now. I disconnected the sub board and found the resistance increased to about 160ohms on the main pcb. I then fired up the main board without the sub board connected and using a logic probe saw activity on the z80 cpu and eproms. With the sub board connected again there's no activity, all the lines are tied low or high and never fluctuate. I removed all the eproms and the single ram chip from the sub board and didn't see any change, so I don't think they are causing the issue.

Any ideas what could be causing this? I don't see any physical damage to the board at all. Here are pics of the sub board. Any help is much appreciated!
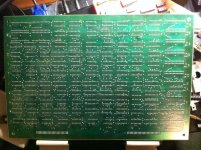
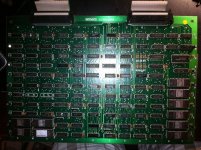
IMG_0419.jpg
IMG_0423.jpg
 

Chempop

BESTEST Buttrider in chat.Officially No.10 at Schm
Joined
Oct 12, 2010
Posts
3,024
Stupid question but are you using a capcom>jamma adapter?
 

hezkezl

n00b
Joined
Aug 15, 2014
Posts
19
Even 160 ohms seems pretty low, but it's hard to know for sure because each board varies.

Have you done a "touch test"? (Lightly touching the ICs to see if there are any that are particularly hot?). That's often a quick and easy way to detect shorts in the components themselves.

I sometimes use freeze spray (or canned air held upside down) to spray components, and see which ones defrost first. The ones that do, I usually give more attention to.

The fact that the board doesn't even clock with the daughter board on, really does point to an issue there, though. Make sure all your connections are secure and that your ribbon cables aren't shifted over by a pin or anything.

Check the solder on your header pins, and make sure none are accidentally bridges, as well. Intuition tells me that the board interconnect cables could very well be the problem here.
 

mikey

Marked Wolf
Joined
Jun 19, 2012
Posts
215
Thanks for the reply's! I changed the cables that connect the boards and no change. I powered up the board for a bit and tried to see if any components were getting hot, but there was nothing really noticeable to the touch. I'll try to grab a can of compressed air and give that a shot either today or tomorrow.
 

hezkezl

n00b
Joined
Aug 15, 2014
Posts
19
You might also want to check those electrolytic capacitors that are around the edge of the board. Sometimes when those are soldered so that they sit high above the board, the legs can get bent and touch.

The pictures aren't too clear, so it's hard to see detail, but the pins at the bottom of capacitor CC21 and CC2 look like they may be touching. The IC at F6 also looks like it may have a pin bridged on the solder side to a pad below it.

If it worked before you moved it, and there have been no changes to the hardware, odds are it's a bent pin or something.
 

mikey

Marked Wolf
Joined
Jun 19, 2012
Posts
215
There was one suspect cap that was a little flimsy, but I replaced it with no change. I narrowed it down a little more and found that it works with one ribbon cable attached, but when the cable located at J & K is connected that's when everything freezes up.

Sorry about the crappy picture quality, I'll see if I can post better ones tomorrow.
 

hezkezl

n00b
Joined
Aug 15, 2014
Posts
19
I see there is a replacement eprom in the lower left corner. Has the board worked since this was replaced?

Also, an easy way to remove some variables from the equation is to pull the 4 roms in the lower left corner, and check your resistance again. If there is a short in one of those roms, the resistance should shoot back up when it is pulled.
 

hezkezl

n00b
Joined
Aug 15, 2014
Posts
19
And just for some extra information that might help you understand the board layout:

The four roms on the lower left (14, 15, 16, 17) are your sprite roms.
The six roms on the right are your tile set roms (background graphics)

The program code, address lookup tables and such are on your main board. The ribbon cable on the right appears to interface with the background roms, and the one on the left (that gives issues when plugged in) looks to interface with the sprite circuitry.

Shorts are notoriously hard to track down. After pulling roms, the next step may be to grab datasheets for all of the various ICs in the sprite section of your board and check resistance between the power and ground pins of those ICs. The resistances should vary slightly, and get lower as you approach the area with the short. The component with the lowest resistance between ground and power is very suspect. Desolder it, and check the resistance on it out of circuit. It should meter as open or high resistance. If it meters with a low resistance, odds are you found your culprit.
 

mikey

Marked Wolf
Joined
Jun 19, 2012
Posts
215
Well, it turned out to be a bad power supply. I started to notice issues on other games as well, so I changed it and now everything is back to normal. Thanks for all the help here, much appreciated!
 
Top