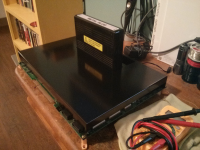
MV2F CMVS Build

Redguard

New Challenger
Joined
Jul 7, 2013
Posts
67
Very cool -- how's your consolization coming along? Wouldn't mind seeing some pictures of your progress :)

All I need to do is install my encoder. I should be receiving it sometime next week. As soon as I get more forum privileges I'll try and post some photos.
 

kuze

Sultan of Slugs
10 Year Member
Joined
Apr 20, 2013
Posts
2,553
Looks good. I would've dusted/washed the board prior to finalizing it.

Also, if you want to protect the JAMMA edge, there's those plastic report covers that have that plastic slide to keep the papers together that you could use (that's how I protect mine).

Yeah good call! I probably should have washed it before starting any work on the project. Those report covers are a good idea for covering the JAMMA edge, I might have to snag some for that purpose.

looking good!

Thanks :)

All I need to do is install my encoder. I should be receiving it sometime next week. As soon as I get more forum privileges I'll try and post some photos.

Nice! Looking forward to seeing it.

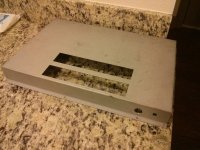
I drilled holes into the metal housing for the power barrel and video out this weekend; ended up skipping the power switch, as I didn't have a drill bit big enough for the rocker switches I have. Since I'm essentially keeping this as basic as possible I'm just going to wire it so when it's plugged in, it's on. My power drill could barely eat through the metal with a 5/8" bit, so I'm happy w/ just having the power/video jacks perfectly sized to my components.

goFRdLj.jpg

I dropped off the metal housing at the local powder coating shop this morning, so hopefully they should get my glossy black finish done in the next few days. If anyone is curious, they quoted me their shop minimum of $50 to get the glossy black powder coat done for just this one piece.
 

Fortune

Zero's Secretary
Joined
Jun 30, 2012
Posts
151
...
I drilled holes into the metal housing for the power barrel and video out this weekend; ended up skipping the power switch, as I didn't have a drill bit big enough for the rocker switches I have. Since I'm essentially keeping this as basic as possible I'm just going to wire it so when it's plugged in, it's on. My power drill could barely eat through the metal with a 5/8" bit, so I'm happy w/ just having the power/video jacks perfectly sized to my components.
...

If you plan on doing any more metal drilling like this, I'd suggest getting a nice set of stepper bits.

They make drilling larger holes in metal a breeze.
 

xsq

Thou Shalt Not, Question Rot.,
Joined
Jan 17, 2013
Posts
7,414
If you plan on doing any more metal drilling like this, I'd suggest getting a nice set of stepper bits.

They make drilling larger holes in metal a breeze.
and deburr at the same time if I'm correct...

Good to read of your progress. Maybe you could add a power switch to the cord of your power supply?
What kind of shop does powder coating btw? I'm thinking about getting one of my older sticks freshened up ;)
 

Redguard

New Challenger
Joined
Jul 7, 2013
Posts
67
I dropped off the metal housing at the local powder coating shop this morning, so hopefully they should get my glossy black finish done in the next few days. If anyone is curious, they quoted me their shop minimum of $50 to get the glossy black powder coat done for just this one piece.

How many days did they quote you?
 

kuze

Sultan of Slugs
10 Year Member
Joined
Apr 20, 2013
Posts
2,553
If you plan on doing any more metal drilling like this, I'd suggest getting a nice set of stepper bits.

They make drilling larger holes in metal a breeze.

One of my buddies at work recommended stepper bits to me today too, I'll definitely have to get a set for future projects. I didn't realize they existed, but they certainly would be /the/ way to drill metal like this.

and deburr at the same time if I'm correct...

Good to read of your progress. Maybe you could add a power switch to the cord of your power supply?
What kind of shop does powder coating btw? I'm thinking about getting one of my older sticks freshened up ;)

Yeah I was considering that, but it's just as easy for me to pop the power connector out of the barrel as it is to reach back there and flip a rocker switch. That's something I definitely might add later though if I decide it's something I want. I googled "powder coating services" in my area and found a shop that specializes in just that.

How many days did they quote you?

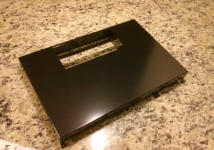
They quoted me 7-10 business days, but they called me 4 hours later and told me it was done. I picked up a couple hours ago and it looks great. Looking forward to putting everything together tonight, or in the next couple of days! :D
 

Xian Xi

JammaNationX,
15 Year Member
Joined
Dec 1, 2005
Posts
27,750
You lucked out. The way powdercoaters do it is they shoot the same color for that day so it looks like they were shooting gloss black that day and when you dropped it off they were probably sandblasting the batch prepping it for paint.
 

kuze

Sultan of Slugs
10 Year Member
Joined
Apr 20, 2013
Posts
2,553
You lucked out. The way powdercoaters do it is they shoot the same color for that day so it looks like they were shooting gloss black that day and when you dropped it off they were probably sandblasting the batch prepping it for paint.

Yeah I was blown away when they called me back so quickly to tell me it was done. I was expecting it to be ready next week.

Here's some pics of how it turned out:

housing.png

front.png

back.png

side.png
 

Redguard

New Challenger
Joined
Jul 7, 2013
Posts
67
What size and what type of PCB standoffs should I use for the plexiglass bottom?
 

goombakid

Fu'un-Ken Master
10 Year Member
Joined
Oct 11, 2011
Posts
1,537
What size and what type of PCB standoffs should I use for the plexiglass bottom?

I used the shortest PCB standoffs I could find (~1/2" height). Keeps a lower profile. Then I used standard screws and washers to hold it in place when I was done.

kuze: I'm looking at the back picture where you have your connectors. Silly question, but you do have them securely fastened on, right?

And if you're looking for stepper drill bits, I got mine fairly cheap at the local Harbor Freight. They do the job.
 

Redguard

New Challenger
Joined
Jul 7, 2013
Posts
67
Cool. I'll post some pics of my progress around Wednesday of this week when I get some quality free time.
 

xsq

Thou Shalt Not, Question Rot.,
Joined
Jan 17, 2013
Posts
7,414
Here's some pics of how it turned out:
Wow, powder coating really does look sweet! These pics and the ones from Xian Xi's sale threads might just convince me to get that done to some multislot covers myself. Surely is the way to go if you want clean and durable results.

Cool build btw., seems to have worked out just right, congratulations.
 

xsq

Thou Shalt Not, Question Rot.,
Joined
Jan 17, 2013
Posts
7,414
Oh, one more thing: If you don't want to add a base, you could just buy some antistatic foam and cut it to fit between the PCB and the feet you already have on there. Turn the feet inward to keep the antistatic foam from falling off (the one I got came as a flexible but sturdy sheet, works very well for this purpose). As a nice side effect you don't need to worry about any static building up ^^ I also spray painted the PCB feet black so they don't stand out too much.

You know what: I suck at explaining this, here's some quick pics. Hope you get what I mean:

[click to enlarge]

If you take your time cutting the foam, IMHO it can look rather nice and it's also very cheap ;) With your 2F you will have to cut some more holes in the middle for the extra feet under the slots, but that shouldn't be too much of a problem if you take measurements.
 
Last edited:

kuze

Sultan of Slugs
10 Year Member
Joined
Apr 20, 2013
Posts
2,553
kuze: I'm looking at the back picture where you have your connectors. Silly question, but you do have them securely fastened on, right?

Yeah they are fastened on well, the ports I drilled are perfectly sized too so that it really took some finesse to get the power barrel and DIN connector fitted in the first place. They're nice and snug, don't move around at all, and definitely don't show any signs of instability when plugging my cables in or pulling them out.

Cool. I'll post some pics of my progress around Wednesday of this week when I get some quality free time.

Sweet, still looking forward to seeing some pics of your machine!

Wow, powder coating really does look sweet! These pics and the ones from Xian Xi's sale threads might just convince me to get that done to some multislot covers myself. Surely is the way to go if you want clean and durable results.

Cool build btw., seems to have worked out just right, congratulations.

Thanks! Yeah Xian Xi's gallery on JNX turned me on to the idea of powder coating in the first place. He really does some quality work and his tutorials are fantastic for noobs like myself. Having my housing powder coated turned out even better than I had expected; it was well worth having done.

Good idea on the anti static foam too; I think I'm going to hold out and get a nice piece of plexi for mine though.

kuze that looks really nice, great job man.

Thanks for the kind words! I'm really appreciative of the support and plethora of ideas/advice the community has provided since I was just in the planning stages of starting this project.
 

Redguard

New Challenger
Joined
Jul 7, 2013
Posts
67
I just dropped off my PCB cover to get powder coated. They quoted me 5 days not including weekends so it should be done by the middle of next week. ..

I still have not received my encoder but this is what I've done so far.

Battery mod / Unibios 3.1
t61e.jpg


5v power and ground
b8k3.jpg


Stereo sound
n60f.jpg
 
Last edited:

Redguard

New Challenger
Joined
Jul 7, 2013
Posts
67
OK, just got the cover back from being powder coated and it is absolutely beautiful. I'm about to put it all together sans the plexi-glass bottom. Question, where do I connect the 5v wire from the encoder to my MV2F?
 
Last edited:

skate323k137

Professional College Dropout
10 Year Member
Joined
Jan 7, 2013
Posts
4,198
OK, just got the cover back from being powder coated and it is absolutely beautiful. I'm about to put it all together sans the plexi-glass bottom. Question, where do I connect the 5v wire from the encoder to my MV2F?

In short, you don't. You just need to supply the encoder with 5v, usually from the same PSU you're using to power the board.
 

Redguard

New Challenger
Joined
Jul 7, 2013
Posts
67
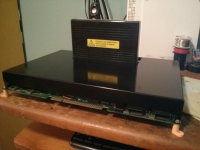
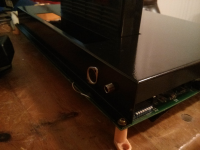
Well I'm finally done and it works like a charm. Thank you everyone especially Xian Xi. Dude, you are an asset to the classic gaming community. Here are some photos. Excuse the shity smart phone picture quality. :)

uwim.jpg

9wi9.jpg

39bb.jpg
 

VaNDAL_UK

n00b
Joined
Apr 11, 2007
Posts
45
Well I'm finally done and it works like a charm. Thank you everyone especially Xian Xi. Dude, you are an asset to the classic gaming community. Here are some photos. Excuse the shity smart phone picture quality. :)

uwim.jpg

9wi9.jpg

39bb.jpg

Sweet NEO!

I'm doing mine and wondering if you are gettng buzzing from the speakers as I've soldered to the same spot for Audio?
 

xsq

Thou Shalt Not, Question Rot.,
Joined
Jan 17, 2013
Posts
7,414
that looks really sweet, congrats to you!
 
Top