The old volume attenuation question...

Mike_Decay

n00b
Joined
Jul 18, 2009
Posts
25
Ok...so I'm building a supergun obviously. Checked all over the forums, read all the posts from 2004 till now...and still can't figure out how the volume attenuation is supposed to work, let alone what I need or how to wire it. (i know i need a board,solder,wire,capacitors, etc. but what kind)

Which way is better? I'm going to be playing a good many boards on this thing...plus a good amount of MVS, so any help would be greatly appreciated.

I think I'm gonna stick with the JROK for the video, hopefully I can get ahold of the guy. I sent an email out to gatorcade...they supposedly have them in stock, I'm just waiting to hear back about the whole "getting the outputs separate from the board for panel mounting".

Got two veroboards coming from UK through ebay, a 8"x 3" x 9" plastic enclosure through ebay (the case has vent holes already machined in the sides, like a meanwell arcade PSU).

Debating whether to get a fully stocked JAMMA harness through Bob Roberts, or make my own as I go. And if i DO get one through Bob, get a normal JAMMA or a NEO JAMMA harness.

All other parts and pieces and odds and ends picked up from Radio Shack.
Plus a BONUS!! Was at Radio Shack th eone day picking up odds 'n ends...came across a 61 piece computer tool set (soldering iron,solder, magnetic pick up tool, probes, IC extractor, etc.) that was normally like $78...on clearance for $29. Then came across a helping hands with two alligator clip, HUGE magnifying glass, and soldering iron station all in one...on clearance for $12. Best part of this whole project. :smirk:
 

buaku

Hardened Shock Trooper
Joined
Dec 3, 2007
Posts
437
Debating whether to get a fully stocked JAMMA harness through Bob Roberts, or make my own as I go. And if i DO get one through Bob, get a normal JAMMA or a NEO JAMMA harness.

Making your own is somewhat of a pain in the ass if you're using the crimp pins, and when I did it, it really didn't save me any money from buying a premade one. Finding the right pins was a pain too. So it depends if you just wanna get it done, or if you enjoy making the stuff yourself. If you make your own and go the crimp pin route I'm sure I could dig up all the part numbers I used.

I would go with whichever harness has the most wires hooked up. I'd imagine the NEO one would have more things in place.
 

Artemio

NEST Puppet
Joined
Feb 27, 2009
Posts
167
I went through that a few weeks ago. I had built one of those attenuators made of two resistors, like such:

http://www.epanorama.net/circuits/speaker_to_line.html (I used this based on a gamesx diagram for building a supergun)

But after some more reading I read on some places that it is not the best route to go safely. I then bought one of these

http://200.78.236.216/catalogo/interior3Shop.asp?pdto=IMP-100

and installed it, and it works flawlessly. It shouldn't be too difficult to build, but for 8 USD it wasn't bad. As mentioned on gamesx you can get one from a car audio shop, or an electronics shop.

Regarding the harness, those linked above look great. I went for one from Jamma Boards, the only pin I missed was tilt, and I soldered that myself (which I haven't used yet, I have mostly CPS-2 and MVS 1F games). Having the labels would be really good to speed things up.
 
Last edited:

Mike_Decay

n00b
Joined
Jul 18, 2009
Posts
25
Thanks Artemio, so how do like the second one? It sound good? roughly what are the dimensions? I'm already freaking out about if I'll have enough room in my enclosure. I know 8x3x9 is big...but I've got a MeanWell MWP-606 PSU I pulled from my MKII cabinet that I'm hoping to put IN the enclosure so everything is in a neat box.

I'm still debating on whether to put the PSU in the supergun with or without the PSU enclosure.
 

xiao_haozi

Avid Neo-Expert
Joined
Jan 22, 2009
Posts
1,977

Mike_Decay

n00b
Joined
Jul 18, 2009
Posts
25
I guess that while I'm at it, I might as well ask about the PSU also. On the back of my PSU it has the standard +5 +12 -5...I know all that. Then the screw terminal for plugging it into a wall outlet. It has AC/N, AC/L, and I'm guessing the upside down tree logo is ground.

Now on the power switch I bought it has 6 small terminals on the back..3 on one side, 3 on the other. My question is which of these 3 do I connect to the PSU and which ones do I connect to the AC power in plug (standard pc monitor/pc tower input) so that I don't get the lines crossed? Sound confusing? Yea it does to me too.
 

Xian Xi

JammaNationX,
15 Year Member
Joined
Dec 1, 2005
Posts
27,750
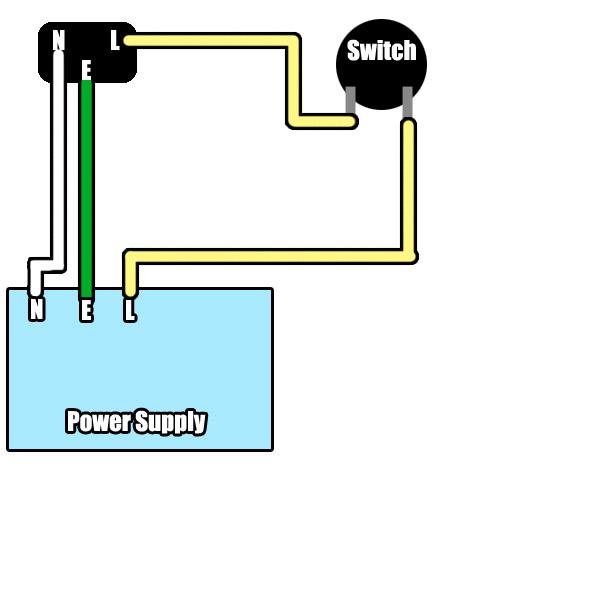
If your PSU is going to be directly connected to your Supergun you can just wire a switch between the Line and PSU and connect the Neutral and Earth directly to the PSU. Make sure you use a good size gauge of wire.
 

Mike_Decay

n00b
Joined
Jul 18, 2009
Posts
25

It's funny I came across James' guiades while searching all over google more than once...and never realized that he was Xian Xi on these forums. I now understand the drawing he has for the audio after I looked at the back of my power on switch. But is his diagram (or similar to it) the one that Artemio said wasn't the best way to do it?
 

Artemio

NEST Puppet
Joined
Feb 27, 2009
Posts
167
It is roughly 10cm x 6cm x 2cm (3.9"x2.35"x.78"). You can also take it outside the enclosure, I was going to but had enough space inside my supergun.

Sound quality is good. I am quite happy with it as it is, I hook it up to a Yamaha RX-V1700 and a couple of Paradigm speakers with a Velodyne Sub. There are no adverse effects over teh audio that I can tell.
 

Mike_Decay

n00b
Joined
Jul 18, 2009
Posts
25
If your PSU is going to be directly connected to your Supergun you can just wire a switch between the Line and PSU and connect the Neutral and Earth directly to the PSU. Make sure you use a good size gauge of wire.

But I don't really want the PSU directly connected ALL the time. When I store it I just want to unplug the cord from the back and stick it on my shelf. Thats why I wanted to go with the 3 prong plug in on the super gun.

It's a pleasure to have you helping me there Xian Xi...probably sounds wierd...but you've been helping me alot all through these forums before I even considered registering.

Nevermind the above comment....i see what your saying Xian Xi...I'm not all that there right now. :P
 
Last edited:

Artemio

NEST Puppet
Joined
Feb 27, 2009
Posts
167
Regarding the diagram linked above, I used it for about a week before switching to this other solution. I read in a couple of places that it was not the best idea to have just the resistors for attenuation in place of the speaker load (effects I read were such as it might overheat the amp in the board).

Here's one of teh sources I found, related to car audio though: http://forums.pcper.com/showthread.php?t=456845

I still continued to use it, and at the time I believed that the CPS-2 Q-sound out was amplified as well, and built another attenuator for it in the same manner. However, I must have done something wrong and shorted something because after my initial sucessful test my supergun stopped working. I was scared believing I had blown the board, but thankfully I had just blown the fuse protecting the 12v line (a 2 amp fuse).

I then decided to buy a proper attenuator, took everything I had placed out (not too much really) and placed it. It has worked perfectly fine so far.

The moral of the story is: Always place those fuses when you are building a supergun!
 
Last edited:

Xian Xi

JammaNationX,
15 Year Member
Joined
Dec 1, 2005
Posts
27,750
It's funny I came across James' guiades while searching all over google more than once...and never realized that he was Xian Xi on these forums. I now understand the drawing he has for the audio after I looked at the back of my power on switch. But is his diagram (or similar to it) the one that Artemio said wasn't the best way to do it?

That's because the old style attenuation circuit is just a voltage divider dropping an expected voltage down to a line level. Some boards don't push as much voltage out over audio so the old style circuit makes it too soft. But that's exactly why it's a switch, you can turn it off and adjust the on board audio level to your liking.

You can go either way.
 

Mike_Decay

n00b
Joined
Jul 18, 2009
Posts
25
Yea, the fuses and fuse holders were the first things i bought. Well thank you Artemio...I'll go with your solution for safe measures...plus it saves me from having to wire or solder anything more than I have to. And thanks for costing me another $8 too!! Hah!

Now with the power switch....lets say I have the 6 terminals on the back...am i correct in assuming I'd wire the line, ground, and neutral on the one set of three, then the neautral and ground only on the other side?
 

Xian Xi

JammaNationX,
15 Year Member
Joined
Dec 1, 2005
Posts
27,750
Then you should do it the way I did mine. My PSU was also internal. For the switch I used a SPST rocker for the power switch.

Mount a 3 prong socket to the enclosure, wire the Neutral and Earth to the PSU. Take the Line from the socket to the rocker and then to the PSU.

So it would be like this:
aznsg3.jpg
 

Mike_Decay

n00b
Joined
Jul 18, 2009
Posts
25
How did you put your pic in there with out a link? I got a 2 pics to throw on here for ya.
 

Mike_Decay

n00b
Joined
Jul 18, 2009
Posts
25
So heres the on/off switch back and the plug in. I labeled what I think to be correct for the wiring...hope you can see the font.

2u7wyv8.jpg


33x98jq.jpg
 
Last edited:

Mike_Decay

n00b
Joined
Jul 18, 2009
Posts
25
I see now. Thanks Xian Xi! Bob Roberts is right...a picture IS worth a thousand words. Thank you all for be very helpful with all this. I'm not an electrician and this stuff isn't hard, so I'm learning fast.

I'll keep everyone posted with my progress as I build this. Xian Xi..what gauge wire do you prefer for the power, and should take back my DPDT rocker and get a SPST one instead?
 

Xian Xi

JammaNationX,
15 Year Member
Joined
Dec 1, 2005
Posts
27,750
You can use the DPDT but just remember there will be 3 settings ON-OFF-ON but you will only be wiring 2 poles so it will be OFF-OFF-ON technically. It might be weird having a rocker that can click twice in the opposite direction so it's up to you if you want to return it for a SPST one. I would.

As far as wire gauge 18 or better, 16 should be good.
 
Top